Table Modifier - The Scan Data Thingy
Adjusting the Timing Tables
STV File Description • Add Timing • Remove Timing • Resetting and Saving • Step By Step
This program was originally written for use with DHP's PowrTuner. I have since sold my PowrTuner and purchased an HPTuner, so I've been adding fuctionality to this program to work with the HPTuner as well. On this page, you will see references to the Good Fuel Spark (GFS) table. This is the same table as the High Octane Spark table in the HPTuner. The Mean Best Torque Spark table is the Max Torque Timing table, but this table is not supported for the HPTuner at this time
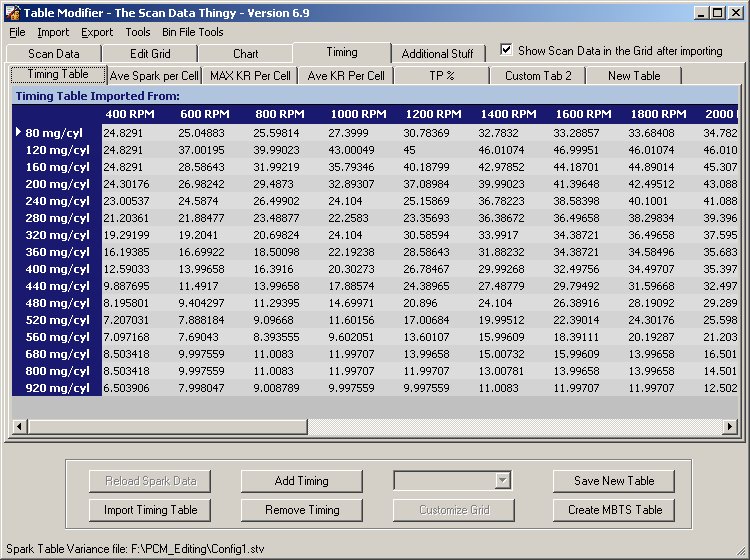
After you have imported a scan, and your current MAF table, click on the 'Timing' tab. You will notice 7 more tabs across the top of the screen:
Before starting to adjust your timing table for the first time, you will want to create a Spark Table Variance (STV) file. Click 'File' and 'New Spark Variance File". You will be asked for the stock GFS and MBTS tables for the tune you are currently working with. I gave the option of creating more than 1 STV file because I have seen people using different year model bins. Different years seem to reteact differently, so I figured this would be needed.
There have been discussions about the advantages to keeping the Good Fuel Spark (High Octane Spark) and Mean Best Torque Spark table variances close to the stock bin file. When making a change to the GFS table, the same amount should be made to the MBTS table. This information is used to create a new MBTS table to complement the new GFS table in order to maintain the stock variance between the two tables. You do not have to import or use the MBTS table but the option is there if you desire
The Spark Table Varience file contains:
The last STV file you use is your default and will be used every time unless you change it. I added a status bar on the botton to show which one is currently being used.
Click the 'Import Timing Table' button and import your current Good Fuel Spark (GFS) table or High Octane Spark table depending on which tuner you're using. If you are using HPTuner, be sure to select the "High Octane Spark Table from HPTuner (*.txt)' as the file type. If you're using Powrtuner, then select 'Good Fuel Spark Table from Powrtuner (*.csv)'
At this point, you have a few choses. There are 2 buttons that will allow you to automatically adjust timing.
Note: These buttons only adjust timing on the imported GFS table. Any changes to this table are added to the grid on the 'New Table' tab.
Automatically Adding Timing
When you press the 'Add Timing' button, you will see the following options screen:
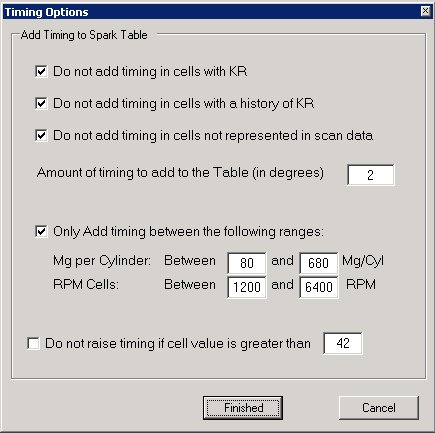
By default in the add timing, the program will:
When you are ready to continue, press 'Finished' to create your new GFS table
Automatically Removing Timing
When you press the 'Remove Timing' button, you will see the following options screen:
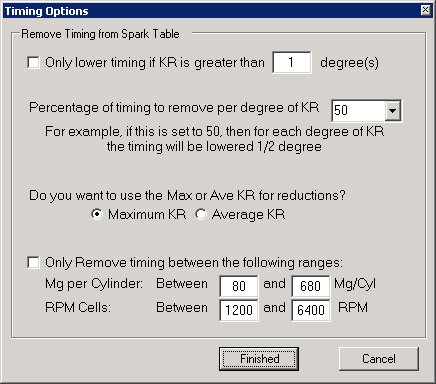
The remove timing button, by default has these settings:
Resetting and Saving your New Table
To reset your new timing table to the same values as the imported GFS table, click 'Reload Spark Data'. You will be asked if you want to reeset the changes mad eto the new table, clisk 'Yes'
The new table can be edited manually also. Just click on the value you want to change and enter the new one. I did not include any kind of global changes here because it is alreay done in PowrTuner.
Importaint Note: Any changes you made to the new table manually will be overwritten if you click 'Remove Timing' or 'Add Timing'. If you need to make manual changes and want to use one of these buttons, use the button first and make your changes manually afterward
When you have created your new GFS table, click the 'Save New Table' button and choose a location for your new GFS table. After this is done, you can create a new Mean Best Torque Spak table using the new GFS table and the tables imported when you created your Spark Table Variance file. Just click 'Create MBTS Table' and choose a location to save it. When this is finished, you are ready to import your new tables in to your bin file using PowrTuner
Step By Step
Now that you have an understanding of the options, here is a step - by - step on how to create a STV file, import your scan, MAF table, and GFS table, and export a new GFS and MBTS table
Before getting started, you will need a couple things.
OK, here we go...
On thing to remember - any time you make a change to a table, import the change to a bin file, and then upload to your PCM, you need to import this table the next time you want to make a change. Do not keep importing the same file or you will never get any results.
Return to the Table Modifier - The Scan Data Thingy Home Page


Home • CJ Pictures • Jokes • Entertainment • Development